Under the IGST law, export of services is considered a zero-rated supply, exempt from GST, and eligible for a refund on GST paid. The GST portal is designed to facilitate efficient refund claims.
Exports of Services
According to Section 2(6) of the IGST Act, tax paid on the export of services is refundable in the following cases:
The service provider is based in India.
The service recipient is located outside India.
The place of service delivery is outside India.
Payment for the service is received in convertible foreign currency.
The service provider and recipient are not establishments of the same entity.
Eligibility Criteria
To claim a refund for services exported with tax payment, the taxpayer must meet the following conditions:
The taxpayer is registered on the GST Portal and has an active GSTIN for the relevant refund period.
Forms GSTR-1 and GSTR-3B must be filed for all tax periods for which the refund is claimed.
The tax on the exported services must have been paid, which is then claimed for a refund.

Required Documents
Applicants must upload necessary documents with Form RFD-01A, as specified under CGST rules or relevant circulars. A statement detailing invoices for services exported with integrated tax or other supporting documents may also be required. Also, we provide the best GST registration & refund services.
Steps to Claim a Refund on Export of Services
To claim a refund for the export of services with tax payment, follow these steps:
Visit the GST Portal: Go to the official GST portal.
Log In: Enter your username and password, and click "Login."
Access Refund Application: Click on "Services," select "Application for refund" from the Refund menu, and choose "Exports of services with payment of tax."

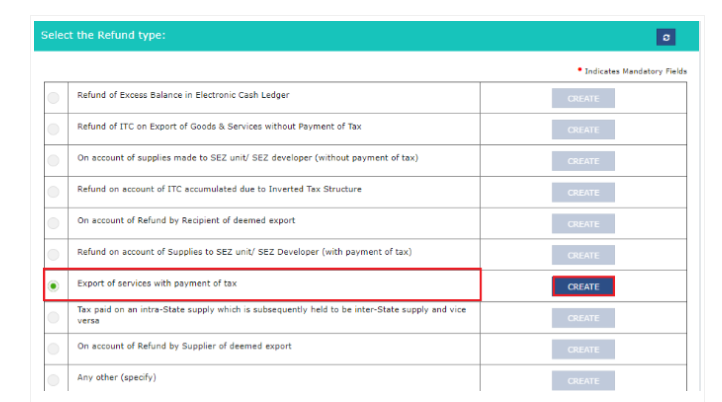
Choose Financial Year: Select the relevant financial year and tax period from the dropdown, then click "Create."
Provide Previous Tax Period Information: If the refund is for all previous tax periods from the date of registration, select “Yes.” If not, select “No.”

Submit Declaration: Check the declaration box, choose the authorized signatory from the dropdown list, and click "File with DSC" or "File with EVC."
For DSC Filing:
Click "Proceed," select your certificate, and click "SIGN."
For EVC Filing:
Enter the OTP sent to the authorized signatory’s email and mobile number, then click "Verify."
In Case of "No"
If you select "No" when asked whether the refund has been made for all previous tax periods, follow these steps:
6: The GST RFD-01 A – Exports of services with payment of tax page will appear.
Note: To proceed, you will need to upload the invoice details for exports of services with Integrated Tax and then file for a refund on the export of services with payment of tax.
Download Offline Utility:
Click the "Download Offline Utility" link.
After the download, click the "Proceed" button to continue.

7: Open the downloaded Excel sheet and input the GSTIN, along with the From and To Return Period in the prescribed format.
8: Enter the GSTIN of the recipient, followed by the invoice details and tax paid. Once completed, click on the "Validate & Calculate" button.
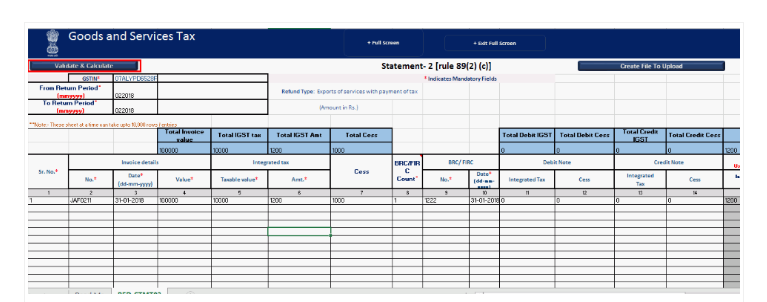
9: A summary of the total number of records in the sheet will be displayed. Confirm by clicking the "Ok" button.
10: Click the "Create File To Upload" button, then save the generated file to your computer.
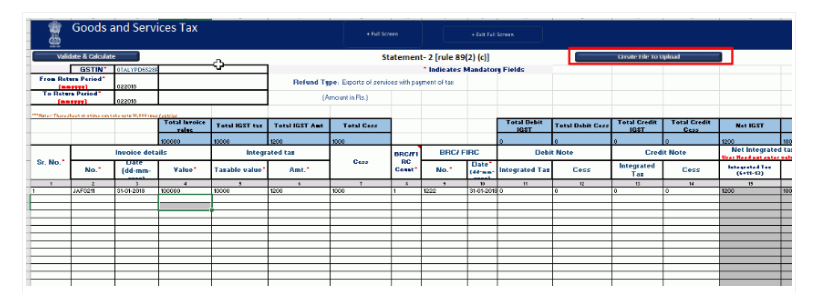
Uploading Invoice Details for Export of Services with Integrated Tax
11: In the GST portal, click on the tab labeled "Click to fill the details of export of services with payment of tax."
12: Press the "Click here to upload" button to upload the file created in the previous steps.

13: Save the refund statement file, and then click "Open" to proceed with the upload.
14: To view the successfully uploaded invoices, click on the "Download Unique Invoices" tab. Once confirmed, press the "Validate Statement" button to complete the validation process.
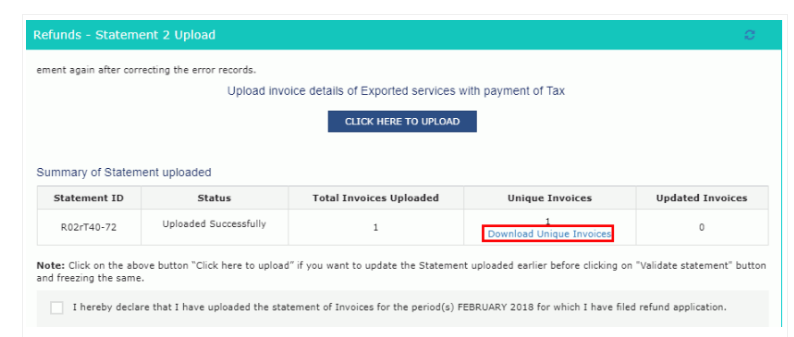
Refund of Exports of Services with Payment of Tax
Step 15: In Statement-2, enter the values corresponding to the tax period for which you are claiming the refund.
Step 16: Click on the hyperlink labeled "Click to view Electronic Liability Ledger" to review the details of your liabilities and dues, including those from returns and other sources. Once reviewed, click "Go back to refund form" to return to the refund application page.

17: From the drop-down list, select your Bank Account Number, upload the required supporting documents, and click the "Submit" button.
18: Once the statement is successfully submitted, a confirmation message will appear on the screen. Click the "Proceed" button to continue.
19: Choose the authorised signatory from the drop-down list and then select either the File with DSC or File with EVC option to complete the submission.
File with DSC Method:
Click the "Proceed" button, select the certificate, and click the "Sign" button.
File with EVC Method:
Enter the OTP sent to the email address and mobile number of the authorised signatory registered on the GST Portal, then click the "Verify" button.
Step 20: After successful submission, an Application Reference Number (ARN) receipt is generated and sent to your registered email and mobile number. You can click the PDF to view and download the receipt for your records.
The service provider is based in India.
The service recipient is located outside India.
The place of service delivery is outside India.
Payment for the service is received in convertible foreign currency.
The service provider and recipient are not establishments of the same entity.
The taxpayer is registered on the GST Portal and has an active GSTIN for the relevant refund period.
Forms GSTR-1 and GSTR-3B must be filed for all tax periods for which the refund is claimed.
The tax on the exported services must have been paid, which is then claimed for a refund.
Visit the GST Portal: Go to the official GST portal.
Log In: Enter your username and password, and click "Login."
Access Refund Application: Click on "Services," select "Application for refund" from the Refund menu, and choose "Exports of services with payment of tax."
Choose Financial Year: Select the relevant financial year and tax period from the dropdown, then click "Create."
Provide Previous Tax Period Information: If the refund is for all previous tax periods from the date of registration, select “Yes.” If not, select “No.”
Submit Declaration: Check the declaration box, choose the authorized signatory from the dropdown list, and click "File with DSC" or "File with EVC."
Note: To proceed, you will need to upload the invoice details for exports of services with Integrated Tax and then file for a refund on the export of services with payment of tax.
Click the "Download Offline Utility" link.
After the download, click the "Proceed" button to continue.
Click the "Proceed" button, select the certificate, and click the "Sign" button.
Enter the OTP sent to the email address and mobile number of the authorised signatory registered on the GST Portal, then click the "Verify" button.

